Glossaries
Introduction
When writing a document that contains some field-specific concepts it might be convenient to add a glossary. A glossary is a list of terms in a particular domain of knowledge with definitions for those terms. This article explains how to create one.
Important advisory note: Your project’s main file should always be in the root directory (outside of any folders), to ensure that all of the compilation steps will be run in the correct directory and to ensure that the required auxiliary files are available, for instance, when creating a glossary or adding an index.
Let's start with a simple example.
\documentclass{article}
\usepackage[utf8]{inputenc}
\usepackage{glossaries}

\makeglossaries

\newglossaryentry{latex}
{
    name=latex,
    description={Is a markup language specially suited
    for scientific documents}
}

\newglossaryentry{maths}
{
    name=mathematics,
    description={Mathematics is what mathematicians do}
}

\title{How to create a glossary}
\author{ }
\date{ }

\begin{document}
\maketitle

The \Gls{latex} typesetting markup language is specially suitable
for documents that include \gls{maths}.

\clearpage

\printglossaries

\end{document}
The following image shows the Glossary produced by the example above:
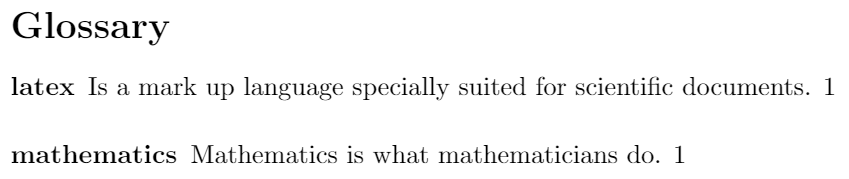
To create a glossary the package glossaries has to be imported. This is accomplished by the line
\usepackage{glossaries}
in the preamble. The command \makeglossaries must be written before the first glossary entry.
Each glossary entry is created by the command \newglossaryentry which takes two parameters, then each entry can be referenced later in the document by the command \gls. See the subsection about terms for a more complete description.
The command \printglossaries is the one that will actually render the list of words and definitions typed in each entry, with the title "Glossary". In this case it's shown at the end of the document, but \printglossaries can be used in any other location.
Terms and Acronyms
Usually there are two types of entries in a glossary: terms and their definitions, or acronyms and their meaning. This two types can be printed separately in your LaTeX document.
\documentclass{article}
\usepackage[utf8]{inputenc}
\usepackage[acronym]{glossaries}

\makeglossaries

\newglossaryentry{latex}
{
        name=latex,
        description={Is a mark up language specially suited for
scientific documents}
}

\newglossaryentry{maths}
{
        name=mathematics,
        description={Mathematics is what mathematicians do}
}

\newglossaryentry{formula}
{
        name=formula,
        description={A mathematical expression}
}

\newacronym{gcd}{GCD}{Greatest Common Divisor}

\newacronym{lcm}{LCM}{Least Common Multiple}

\begin{document}

The \Gls{latex} typesetting markup language is specially suitable
for documents that include \gls{maths}. \Glspl{formula} are
rendered properly an easily once one gets used to the commands.

Given a set of numbers, there are elementary methods to compute
its \acrlong{gcd}, which is abbreviated \acrshort{gcd}. This
process is similar to that used for the \acrfull{lcm}.

\clearpage

\printglossary[type=\acronymtype]

\printglossary

\end{document}
The following image shows part of the output produced by the example above:
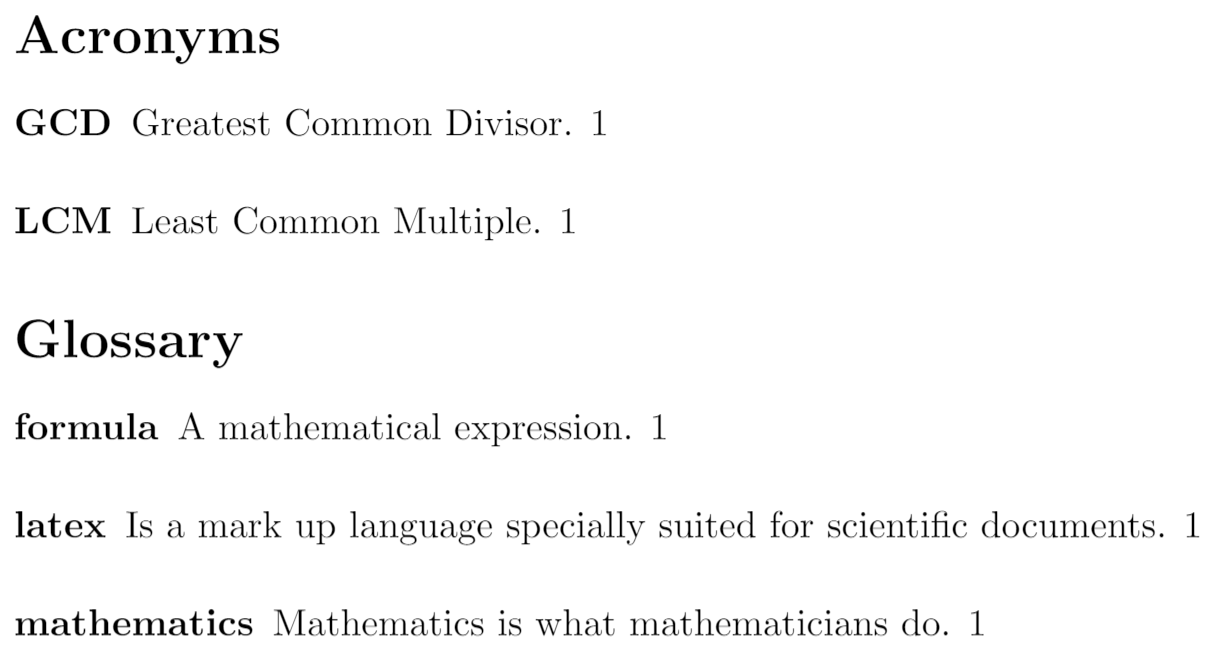
The following subsections explain how to create each of the list types.
Terms
As seen in the introduction, terms are defined by means of the command \newglossaryentry
\documentclass{article}
\usepackage{glossaries}

\makeglossaries


\newglossaryentry{maths}
{
    name=mathematics,
    description={Mathematics is what mathematicians do}
}

\newglossaryentry{latex}
{
    name=latex,
    description={Is a markup language specially suited for
scientific documents}
}


\newglossaryentry{formula}
{
    name=formula,
    description={A mathematical expression}
}

\begin{document}

The \Gls{latex} typesetting markup language is specially suitable
for documents that include \gls{maths}. \Glspl{formula} are rendered
properly an easily once one gets used to the commands.

\clearpage

\printglossary

\end{document}
The following image shows the Glossary created by the example above:
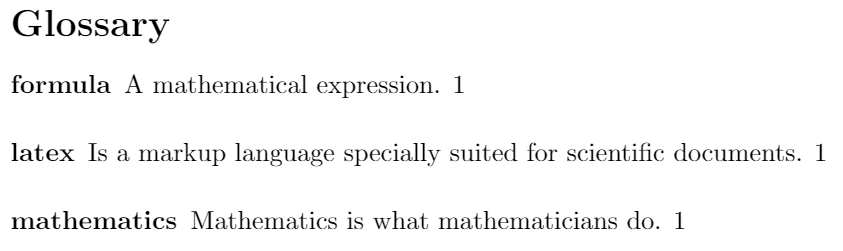
Let's see in more detail the syntax of each parameter passed to the command \newglossaryentry. The first term defined in the example is "mathematics".
maths. This first parameter is the label of this term and is used to reference it within the document withgls
name=mathematics. Includes The word to be defined, in this case "mathematics". It's recommended to write it in lowercase letters and singular form.
description={Mathematics is what mathematicians do}. Inside the braces is the definition of the current term.
After you have defined the terms, to use them while you are typing your LaTeX file use one of the commands describe below:
\gls{ }- To print the term, lowercase. For example,
\gls{maths}prints mathematics when used.
\Gls{ }- The same as \gls but the first letter will be printed in uppercase. Example:
\Gls{maths}prints Mathematics
\glspl{ }- The same as \gls but the term is put in its plural form. For instance,
\glspl{formula}will write formulas in your final document.
\Glspl{ }- The same as \Gls but the term is put in its plural form. For example,
\Glspl{formula}renders as Formulas.
Finally, to print the glossary use the command
\printglossary
Acronyms
An acronym is a word formed from the initial letters in a phrase. Below is an example of acronyms in LaTeX
\documentclass{article}
\usepackage[acronym]{glossaries}

\makeglossaries

\newacronym{gcd}{GCD}{Greatest Common Divisor}

\newacronym{lcm}{LCM}{Least Common Multiple}

\begin{document}
Given a set of numbers, there are elementary methods to compute
its \acrlong{gcd}, which is abbreviated \acrshort{gcd}. This process
is similar to that used for the \acrfull{lcm}.

\clearpage

\printglossary[type=\acronymtype]

\end{document}
The following image shows part of the output produced by the example above:
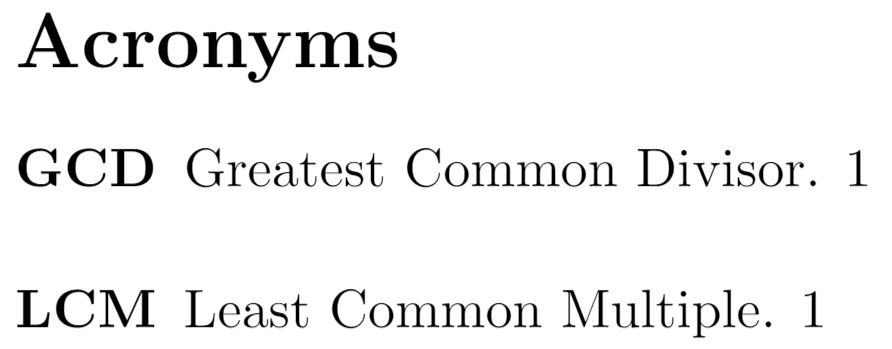
To use acronyms an additional parameter must be used when importing the glossaries package. The line to be added to the preamble is
\usepackage[acronym]{glossaries}
Once this line is added, the command \newacronym will declare a new acronym. For the sake of an example, below is a description of the command \newacronym{gcd}{GCD}{Greatest Common Divisor}
gcdis the label, used latter in the document to reference this acronym.
GCDthe acronym itself. Usually acronyms are written in capital letters.
Greatest Common Divisoris the phrase this acronym is used for.
After the acronyms have been included in the preamble, they can be used by means on the next commands:
\acrlong{ }- Displays the phrase which the acronyms stands for. Put the label of the acronym inside the braces. In the example,
\acrlong{gcd}prints Greatest Common Divisor.
\acrshort{ }- Prints the acronym whose label is passed as parameter. For instance,
\acrshort{gcd}renders as GCD.
\acrfull{ }- Prints both, the acronym and its definition. In the example the output of
\acrfull{lcm}is Least Common Multiple (LCM).
To print the list of acronyms use the command
\printglossary[type=\acronymtype]
The acronyms list needs a temporary file generated by \printglossary to work, thereby you must add said command right before the line \printglossary[type=\acronymtype] and compile your document, once you've compiled your document for the first time you can remove the line \printglossary.
Changing the title of the Glossary
If you want to change the default title of the glossary for something else, this is straightforward, two parameters must be added when printing the glossary. Below is an example.
\documentclass{article}
\usepackage{glossaries}

\makeglossaries


\newglossaryentry{maths}
{
    name=mathematics,
    description={Mathematics is what mathematicians do}
}

\newglossaryentry{latex}
{
    name=latex,
    description={Is a markup language specially suited for
scientific documents}
}


\newglossaryentry{formula}
{
    name=formula,
    description={A mathematical expression}
}

\begin{document}

The \Gls{latex} typesetting markup language is specially suitable
for documents that include \gls{maths}. \Glspl{formula} are rendered
properly an easily once one gets used to the commands.

\clearpage

\printglossary[title=Special Terms, toctitle=List of terms]

\end{document}
The following image shows part of the output produced by the example above:
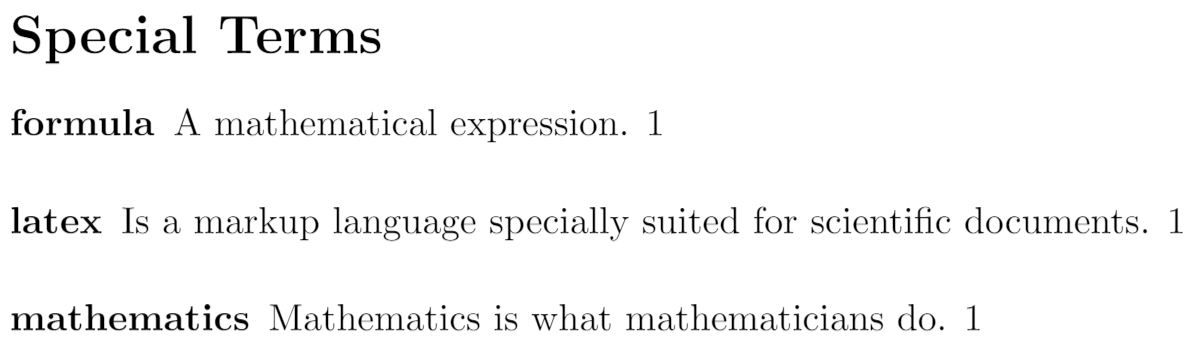
Notice that the command \printglossary has two comma-separated parameters:
title=Special Termsis the title to be displayed on top of the glossary.
toctitle=List of termsthis is the entry to be displayed in the table of contents. See the next section.
Show the glossary in the table of contents
For the glossary to show up in the table of contents put
\usepackage[toc]{glossaries}
in the preamble of your document
\documentclass{article}
\usepackage[toc]{glossaries}

\makeglossaries

\newglossaryentry{maths}
{
    name=mathematics,
    description={Mathematics is what mathematicians do}
}

\newglossaryentry{latex}
{
    name=latex,
    description={Is a markup language specially suited for
scientific documents}
}


\newglossaryentry{formula}
{
    name=formula,
    description={A mathematical expression}
}

\begin{document}

\tableofcontents

\section{First Section}
The \Gls{latex} typesetting markup language is specially suitable
for documents that include \gls{maths}. \Glspl{formula} are rendered
properly an easily once one gets used to the commands.

\clearpage

\printglossary[title=Special Terms, toctitle=List of terms]

\end{document}
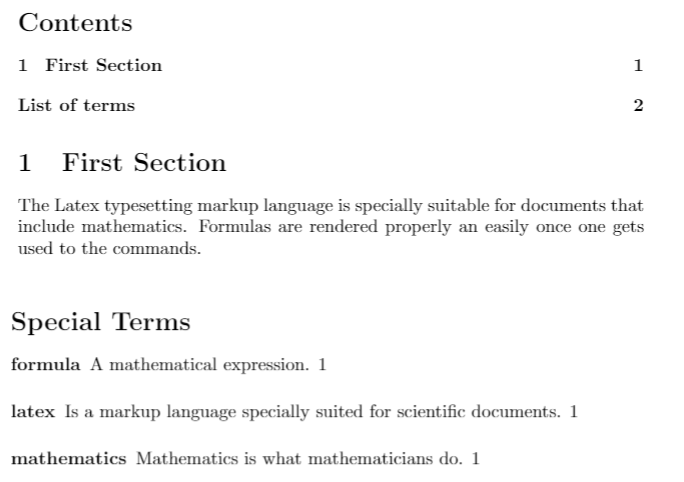
The following image shows the content of the 2 pages produced by the example above. Note how the command
\printglossary[title=Special Terms, toctitle=List of terms]
produces different titles for the table of contents ("List of terms") and the corresponding heading used in the text ("Special Terms"):
Compiling the glossary
To compile a document that contains a glossary in Overleaf you don't have to do anything special, but if you add new terms to the glossary once you compiled it, make sure to click on Clear cached files first under logs option).
If you are compiling the document, for instance one called glossaries.tex, using pdflatex on your local machine, you have to use these commands:
pdflatex glossaries.tex
makeglossaries glossaries
pdflatex glossaries.tex
Reference guide
Styles available for glossaries
The command \setglossarystyle{style} must be inserted before \printglossaries. Below a list of available styles:
- list. Writes the defined term in boldface font
- altlist. Inserts newline after the term and indents the description.
- listgroup. Group the terms based on the first letter.
- listhypergroup. Adds hyperlinks at the top of the index.
Further reading
For more information see: